Episerver: All Properties component for showing and hiding content using a drop-down

As a follow up to my previous article about grouping properties in a property block, I’ll describe how to create a component for showing and hiding content in all properties mode using a drop-down.


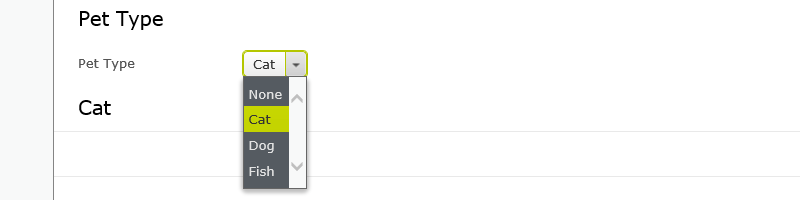
Having part of your form visible depending on some selection is a pretty normal use case. It is clear to the user what is selected and which other inputs are available, instead of just showing everything.

The challenge was figuring out how backend (Blocks) and frontend (Dojo) are working in together Episerver. There is a great article that helped me understand this. My goal was slightly different, so I’ll describe my thought process while figuring out the solution.

The scenario I will describe is following: There are three different pet types in our system. The user can choose only one using a dropdown. Each choice shows only properties for that pet type. Each pet type is a block with its own properties, and we are using each of those blocks as a property block next to a dropdown.

To create a demo project, follow instructions from the last blog post.

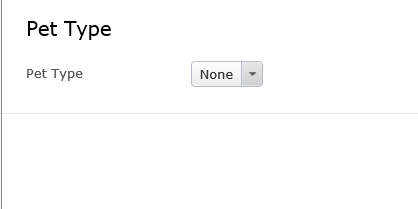
First step is pretty straigh foreward - create a new page type or a block with all the properties described in the scenario. For a dropdown use single selection solution from Episerver.

1
2
3
4
5
6
7
8
9
10
11
12
13
14
15
16
17
18
19
20
21
22
23
24
25
26
27
28
29
30
31
32
33
34
35
36
37
38
39
40
41
42
43
44
45
// PetTypeBlock.cs
[ContentType(DisplayName = "PetTypeBlock", GUID = "5d414eb6-de73-49db-a12c-c750fce4578c", Description = "", AvailableInEditMode = false)]
public class PetTypeBlock : BlockData
{
[SelectOne(SelectionFactoryType = typeof(PetTypeSelectionFactory))]
[Display(Name = "Pet Type", GroupName = SystemTabNames.Content, Order = 1)]
public virtual string SelectedPetType { get; set; }

[Display(Name = "Cat", GroupName = SystemTabNames.Content, Order = 10)]
public virtual CatBlock CatBlock { get; set; }

[Display(Name = "Dog", GroupName = SystemTabNames.Content, Order = 20)]
public virtual DogBlock DogBlock { get; set; }

[Display(Name = "Fish", GroupName = SystemTabNames.Content, Order = 30)]
public virtual FishBlock FishBlock { get; set; }

public override void SetDefaultValues(ContentType contentType)
{
base.SetDefaultValues(contentType);

SelectedPetType = ((int)PetType.None).ToString();
}
}

public class PetTypeSelectionFactory : ISelectionFactory
{
public IEnumerable<ISelectItem> GetSelections(ExtendedMetadata metadata)
{
return new ISelectItem[] {
new SelectItem() { Text = PetType.None.ToString(), Value = ((int)PetType.None).ToString() },
new SelectItem() { Text = PetType.Cat.ToString(), Value = ((int)PetType.Cat).ToString() },
new SelectItem() { Text = PetType.Dog.ToString(), Value = ((int)PetType.Dog).ToString() },
new SelectItem() { Text = PetType.Fish.ToString(), Value = ((int)PetType.Fish).ToString() }
};
}
}

public enum PetType
{
None = 0,
Cat = 1,
Dog = 2,
Fish = 3
}

Here are the individual blocks whose content we want to toggle by changing the values in the dropdown.

1
2
3
4
5
6
7
8
9
10
11
12
13
14
15
16
17
// CatBlock.cs
[ContentType(DisplayName = "CatBlock", GUID = "837e9ed7-03ae-4013-97f6-0db251f0a8e3", Description = "", AvailableInEditMode = false)]
public class CatBlock : BlockData
{
}

// DogBlock.cs
[ContentType(DisplayName = "DogBlock", GUID = "8055ac0e-27fb-44a2-bc9f-8cb146ab7e4f", Description = "", AvailableInEditMode = false)]
public class DogBlock : BlockData
{
}

// FishBlock.cs
[ContentType(DisplayName = "FishBlock", GUID = "59f93439-8f49-4ba9-a01e-a62a97efb400", Description = "", AvailableInEditMode = false)]
public class FishBlock : BlockData
{
}

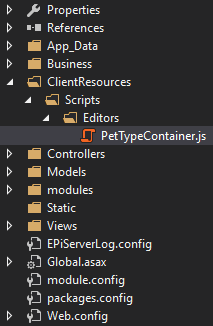
Next step is to create editor descriptor so that Episerver knows on which object we want the Dojo script to load, and the actual path to the script. Editor descriptors are usually placed inside the Business folder. ClientLayoutClass path is related to what is described in the next step.

1
2
3
4
5
6
7
8
9
10
// StartPageEditorDescriptor.cs
[EditorDescriptorRegistration(TargetType = typeof(PetTypeBlock))]
public class StartPageEditorDescriptor : EditorDescriptor
{
public override void ModifyMetadata(ExtendedMetadata metadata, IEnumerable<Attribute> attributes)
{
base.ModifyMetadata(metadata, attributes);
metadata.Properties.Cast<ExtendedMetadata>().First().GroupSettings.ClientLayoutClass = "myapp/editors/PetTypeContainer";
}
}

In the root of your project in modules.config you have to declare what your Episerver scripts folder is - in this case it is in ProjectRoot\ClientResources\Scripts. ClientResources folder is Episerver convention.

myapp is a connection between the script and ClientLayoutClass path from StartPageEditorDescriptor

1
2
3
4
5
6
7
8
<?xml version="1.0" encoding="utf-8"?>
<module>
<dojo>
<paths>
<add name="myapp" path="Scripts" />
</paths>
</dojo>
</module>

The script is the mix of Dojo and jQuery. It is not an elegant solution, but it works. The challenge was finding the right element which represents one of the added blocks we want to show/hide. I asked on Epi formus about some inconsistencies regarding generated HTML, but no cigar.

1
2
3
4
5
6
7
8
9
10
11
12
13
14
15
16
17
18
19
20
21
22
23
24
25
26
27
28
29
30
31
32
33
34
35
36
37
38
39
40
41
42
43
// PetTypeContainer.js
define([
"dojo/_base/declare",

"epi/shell/layout/SimpleContainer"
],
function (
declare,

SimpleContainer
) {
return declare([SimpleContainer], {
petTypeDropdown: null,

addChild: function (child) {
this.inherited(arguments);

if (child.name.indexOf("petType") >= 0) {
this.petTypeDropdown = child;
var self = this;

setTimeout(function () {
self._hideAll();
}, 0);
this.own(this.petTypeDropdown.on("change",
function (petType) {
self._hideAll();
self._updateVisiblePetType(petType);
}));
}
},

_updateVisiblePetType: function (petType) {
$(document).find('input[name*=petType.selectedPetType]').closest('ul').children().eq(petType).show();
},

_hideAll: function () {
$.each([ 1, 2, 3 ], function(index, value) {
$(document).find('input[name*=petType.selectedPetType]').closest('ul').children().eq(value).hide();
});
}
});
});

As a final step, if you created a block instead of a page - add that block compoment to the page.

1
2
3
4
5
6
7
// PetPage.cs
[ContentType(DisplayName = "PetPage", GUID = "317e0860-8466-4817-8c9e-b33e83a297a4", Description = "")]
public class PetPage : PageData
{
[Display(Name = "Pet Type", GroupName = SystemTabNames.Content, Order = 10)]
public virtual PetTypeBlock PetType { get; set; }
}

The end result is a dropdown that shows different blocks.

This turned out to be very usefull feature for my project, and hopefully you will find good use for it in your projects as well!


To take screenshots I use LightShot
To record gifs I use ScreenToGif